


Lily Blumen-Stehlampe
- Auf Lager
- LED-Leuchtmittel enthalten
- Nachhaltige Verpackungen
- Sichere Zahlungen speichern
- Unterstützung bei der Anpassung
- Kostenloser Standardversand
Verwenden Sie ausklappbare Tabs für detailliertere Informationen, die Kunden bei ihrer Kaufentscheidung helfen.
Bsp.: Versand- und Rückgabebedingungen, Größentabellen und andere häufige Fragen.
Botanische Lilienblüte & Retro-Wohnatmosphäre
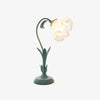
Verleihen Sie Ihrem Wohnraum nostalgischen Charme und organischer Eleganz mit der Lily Floral Floor Lamp. Inspiriert von botanischen Formen des Jugendstils, verfügt diese skulpturale Stehleuchte über anmutig geschwungene Metallstiele, die mit blühenden Lilienlampenschirmen aus satiniertem Acryl und Metall geschmückt sind. Sie strahlt ein sanftes, nach unten gerichtetes, warmes 3000-K-Licht aus, das neben Wohnzimmersofas, Lesesesseln und Nachttischbereichen einen gemütlichen, einladenden Blickfang schafft.
Die Lily-Stehleuchte ist in 2- und 3-flammigen, kaskadenförmigen Ausführungen mit sorgfältig ausgewählten Oberflächen in Grün und Weiß erhältlich und verbindet nahtlos rustikale Retro-Ästhetik mit modernem nordischem Minimalismus.
Produkt-Videovorstellung
Vervollständigen Sie die Kollektion
Kombinieren Sie Ihre Stehleuchte mit passenden botanischen Leuchten für ein stimmiges Beleuchtungskonzept:
Produkt-Größe
Technischer Maßstabsplan

Parameter
Supportmaterialien


Häufig gestellte Fragen
Welche Art von Glühbirne benötigt die Lily Floral Stehlampe? +
Die Lampe verfügt über Standard-Schraubfassungen E26 (Nordamerika) oder E27 (Europa & International). Sie ist kompatibel mit LED-, Edison-Filament- und Glühlampen in warmweißem 3000K.
Wo lässt sich diese Stehlampe im Zuhause am besten zur Geltung bringen? +
Mit ihrer Höhe von 170 cm (66,9″) und dem schlanken Sockelfußmaß von 20 cm eignet sie sich hervorragend neben Wohnzimmersofas, Lesesesseln, Eckkommoden und Schlafzimmer-Loungebereichen.
Ist die Lampe für eine universelle Wechselspannung von 110–240 V (AC) geeignet? +
Ja. Die Leuchte ist vollständig für den weltweiten Betrieb mit einer universellen Wechselspannung von 110–240 V in den USA, Kanada, Europa, Australien und weltweit zertifiziert.
Kaufhinweise
Wir empfehlen Kunden, uns vor der Bestellung bei Fragen zu Maßen, Personenzahl oder Ausführung zu kontaktieren.
Wenn Sie Probleme bei der Zollabfertigung oder mit Transportschäden haben, kontaktieren Sie uns bitte per E-Mail: info@dekoorlight.com. Wir antworten innerhalb von 12 Geschäftsstunden.


